Nikon Measuring Instruments User Case Study — 2 — Tammy Machinery Co., Ltd.
Nikon brings you the second in a series of reports where we visit various manufacturing sites that use Nikon's measuring instruments to manage product quality.
This is a report of our visit to Akita Prefecture in northern Japan where Tammy Machinery Co., Ltd. (President: Ken Takahashi), of Ayase City, Kanagawa Prefecture, has its manufacturing facility. Our interview took place on June 9, 2009.
Top market share in molds for fiber optic ferrules
Tammy Machinery*1 was established in 1970 to manufacture and market precision molds and parts. In 2001, the company moved its head office to Ayase City in Kanagawa Prefecture and its Akita factory to Yuzawa City in Akita Prefecture. The Akita factory, which produces molds, has been designated a "Fundamental Industry Company of Akita Prefecture."
Tammy Machinery is a leading manufacturer of specialized small precision dies and molds with clamping forces of up to 150 t. The company's ultra-precision mold manufacturing technology for optical pickups, fiber optic ferrules and other core parts used in IT-related devices is highly acclaimed both in Japan and overseas.
While members of Tammy Machinery's staff were giving us detailed descriptions of the dies and mold manufacturing line at their Akita factory, we were able to see measuring procedures taking place around us.
- *1Tammy Machinery Co., Ltd.
Head office: Fukayanaka 8-3-6, Ayase, Kanagawa, Japan 252-1107
Akita factory: Dannoue 8-1, Iwasaki-aza, Yuzawa, Akita, Japan 012-0801
Teamwork geared to the layout of the machining site
The dies and mold manufacturing line is laid out in a series of processes that include rough machining, hole drilling, milling, lathe grinding, electrical discharge machining, and finishing. It was possible for us to see steps involved in machining precision as the parts, in lot sizes from 4 to 8, were relayed to the next process.
President Takahashi explained that teamwork was required to produce precision molds, since the results needed to be absolutely perfect.
Mold manufacturing starts when 3D mold design data arrives from Tammy Machinery's head facility in Ayase. The 3D mold design data is converted to CAM data. 2D charts for the profile grinding machine are also made if required.
Prior to quenching, the materials undergo milling, hole making at the machining center, and cutting; cylindrically-shaped items are first cut on a lathe, then quenched and passed on to the grinding process. Among the variety of grinding machines used at Tammy Machinery's Akita factory are surface grinders, cylinder grinders, internal grinders, jig grinders and profile grinders.
One Nikon Digimicro has been installed at each of the grinders. In order to meet machining requirements at the micrometer level, machining personnel continually repeat measurements to achieve total precision in dimensions.

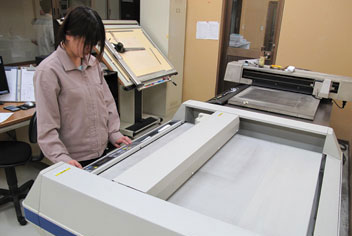
A Mutoh PG820 high-performance chart generation system is used to produce 2D charts for the 20X/50X profile grinders.

Grinding personnel depend on the Digimicro to manage dimensions.
One of the recent market requirements of NC machine tools has been support for "OMV — on-machine verification" that performs inspections during machining. Tammy Machinery brought back memories for us of the former Nikon (Nippon Kogaku K.K.), which first combined an inspection unit with a machine tool to make a single device. The device that was in operation during the profile machining process was an Okamoto Machine Tool Works horizontal optical profile grinding machine with a Nippon Kogaku OGC-2 (released in 1973).
At the profiling stage, pieces are machined in conformance to a projection chart produced in advance. These days, most profile grinders are of the vertical type. Tammy Machinery President Takahashi explains: "[When a horizontal projection grinder is used] the pieces being machined are placed on a table, so there's no worry about them falling while they're being mounted. It's a very intelligent, sound structure." Tammy Machinery still has five of the global total of 40 machines that have been manufactured. Even though spare parts for repairs are no longer widely available, the company takes good care of its machines, turning to auctions and other such markets to find necessary parts.

Jig grinder made by Moore Tool of the United States: The operator uses his left hand to carefully control hole dimensions and pitch while aurally checking the grind stone that performs sun-and-planet motions.

Okamoto Machine Tool Works horizontal optical profile grinding machine with Nippon Kogaku OGC-2 (1973) is in operation to constantly grind profiles.
"Kite-string focus aid" and "CeZr Side Measurement Probe for Digimicro" for improving productivity
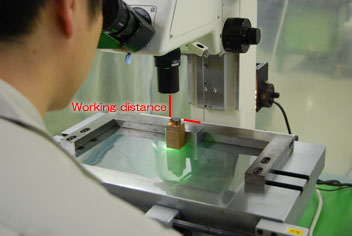
At the machining site, measuring time is immediately reflected in productivity. This is the source of ideas on how to speed up the measuring process. Next to the objective lenses of Nikon's measuring microscopes is a length of string hanging down. "Do you know what this is?" Takahashi asked. We soon found out when we saw it being used. Since the mold parts and electrical discharge electrodes are not of the same height, it is not rare for the lens barrel to move quite a distance when focusing. To focus quickly, it is also necessary to commit to memory the operation distance from the objective lens to the surface of the subject being brought into focus. To quickly shift to the measuring operation here, the lens barrel is lowered or raised to a spot near the surface of the part to be focused on. Focusing is performed through the eyepiece.
The Digimicro as is can only measure step heights in a single dimension and make comparisons. Most customers including Tammy Machinery make their own probes at the tips of narrow pins that enable measurements of horizontal channels.

Measuring electrical discharge machining electrodes. The "kite string" is hanging down from the fiber illuminating adapter on the right side of the objective lens.

Pin-type probes of various diameters (at back) and probes for horizontal channel measurements (in front)
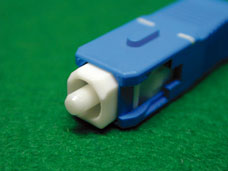
Fiber optic connector coupling, unlike electrical wire coupling, requires micrometer precision in order to thoroughly minimize transmission loss. To secure precision in a stable manner, zirconia ceramic is used for the ferrule material. Tammy Machinery has CIM (Ceramics Injection Molding) prototyping equipment at its head office and is capable of producing prototypes and small production volumes from mold manufacturing to sintering.

The center hole diameter is 0.11 mm. This hole is where ferrules with runners attached and optical fibers are joined.

A fiber optic connector

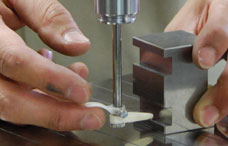
Using a "CeZr Side Measurement Probe for Digimicro" to measure machined dimensions of a transverse groove
Sprue (a vertical channel in a mold, used to pour in molten material), runner and other return materials are produced in this CIM process. After Tammy Machinery studied the effective use of these return materials in-house, they merged on-site measuring tasks with their own zirconia ceramic high-precision forming and machining technology, and created a probe they named "CeZr Side Measurement Probe for Digimicro" that could be mounted to the front end of a Digimicro and has the ability to measure transverse grooves. Zirconia ceramic is non-magnetic, so iron powder does not stick to the probe during grinding. Furthermore, it is sufficiently hard, does not rust and can be produced in large volume. In addition, a miniature R section was added to the tip of the probe to ensure measuring reproducibility and prevent chipping on the machined pieces.
Wish list for Nikon measuring instruments: One-touch operation and easy-to-read manual
In keeping with the concept of "Taking individual responsibility for producing quality," machining personnel at Tammy Machinery handwrite the dimensions on the final drawing before shipping the product. Since machining and measuring are performed by the same people, all of them are able to operate the measuring instruments. They all believe it is important to have one-touch operation whenever possible and for the manual to be easy enough for them to understand. They point out that the manual for the current DP-E1 data processor concerns operations where the same item is measured multiple times and that it does not seem to be written for people who measure a variety of items. We at Nikon highly value this feedback from sites where Nikon's products are used. We wish to incorporate such ideas in the development of future products..
(Photos and text: Shuichi Sakai, Industrial Instruments Section, Sales Strategy Department, Nikon Instruments, Inc.)
Call for "CeZr Side Measurement Probe for Digimicro" monitor users: Accepting the first 300 applications
Nikon Instruments will provide a trial version of the "CeZr Side Measurement Probe for Digimicro" at no charge to customers using a Nikon Digimicro. Interested customers should contact us at the address below for a monitor application form.
