Nikon Measuring Instruments User Case Study — 1 — Sansyu Precision Hong Kong Limited
This report is the first in a series in which Nikon representatives visit various manufacturing sites where Nikon measuring instruments are used in various stages of manufacturing to confirm product quality.
Our first visit was to Hong Kong, home of Sansyu Precision Hong Kong Limited (Managing director: Munekatsu Kamiya). The interview was conducted by Shuichi Sakai of the Sales Strategy Department at Nikon's Instruments Company.
Manufacturing and measuring of precision molds used in the manufacturing of micro parts
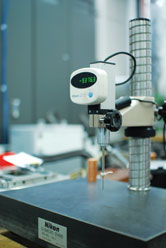
Nikon Digimicro MF-501
Sansyu Precision H.K. Limited* (SPH), which was established in 1987 and is the largest overseas manufacturing facility of the Sansyu Group, is located in Hieda-cho, Takahama City, Aichi Prefecture, Japan. SPH operates a total of 117 small injection molding machines in its specialized field of manufacturing precision micro parts. These machines have a clamping force of 70 KN (7 tf) or 190 KN (18 tf) and produce more than 1.2 billion pieces annually. In addition to injection molding lines, SPH also has a Tooling Department that repairs existing dies and molds and manufactures new dies and molds on site. Its manufacturing facilities are equipped with the state-of-the-art measuring instruments to ensure quality assurance at every step of production.
SPH's production equipment and quality control systems are automated. Company-developed theories and technologies ensure the rationalization of production. The Production Management Department is able to maintain consistent quality and productivity through integrated management of the entire manufacturing process from the machining of molds to the formation of individual parts. Quality control data is entered into the host computer in real time, and registered members and clients can view the latest data on the company's website.

Nikon Stereoscopic Microscope SMZ-1500
Managing director Munekatsu Kamiya also serves as CEO of Spiral Logic, Ltd., which, with Sumitomo Heavy Industries, Ltd., at the International Plastics Fair in 2008, unveiled the "new-theory plasticization unit" based on the invention of a newly-designed screw that has revolutionized injection molding technology. The new unit cuts screw costs and contributes to quality improvements in molded products.
SPH has installed Nikon MM series optical measuring microscopes, E-MAX V metrology software with image processing features and CNC video measuring systems such as Nikon's iNEXIV VMA-2520 with touch probe. Nikon's SMZ-1500 stereoscopic microscopes with high-resolution digital still cameras and Digimicro digital length measuring systems are also in use at SPH. Carl Zeiss 3D measuring instruments and Keyence video microscopes and laser microscopes are also used in the manufacturing process to achieve just-in-time mold measuring and inspection from dimensions to roughness.
During our visit, we talked to Mr. Warren Lau Wai Yeung and Mr. Choi Chiu Che of the Tooling Division.
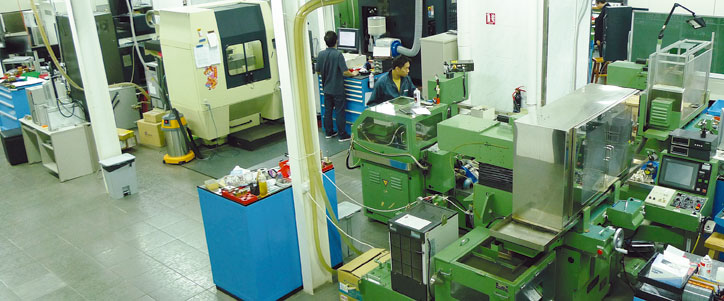
SPH's Tooling Department. The floor has been designed to minimize vibration, and control humidity, temperature and temperature gradients at appropriate levels.
- *Sansyu Precision H.K. Ltd.
Unit 910, 9/F., Block B, Po Lung Centre, 11 Wang Chiu Rd.,
Kowloon Bay, Hong Kong
Tel: +852-2796-2327 Fax: +852-2796-0064
e-mail: webmaster@sph.com.hk
Nikon: SPH has installed a very impressive array of inspection measuring instruments in its Tooling Department, hasn't it?
Warren: Yes, all members of staff at the SPH Tooling Division are thoroughly familiar with all the machines, measuring instruments, and inspection equipment. We have in particular adopted the Erowa chuck system to raise the reproducibility of machining positions and shorten setup times, and Nikon measuring instruments are vital for obtaining the machining home position data of the Erowa chuck system. We also adopted the Nikon SMZ-1500 because we needed high magnifications and high zoom ratios for observing the machined metal surfaces of micro molds. Visibility and quantification of surface conditions are also vital for the manufacture of good-quality molds, so we are using Keyence laser microscopes to inspect these aspects.
Measuring digital image processing
Nikon: We are extremely pleased that Nikon's measuring instruments are playing an important role in the ultra-precise manufacturing of molds. SPH is also using the Nikon E-MAX metrology software for all of its measuring microscopes and profile projectors, so have you experienced any confusion or difficulties by suddenly changing from the touch-panel operation of a device like the DP-302 data processor?
Warren: Actually, I especially like the Nikon E-MAX metrology software. As you can see, SPH has adopted the LCD touch screen flat panel throughout the company, so by totally eliminating keyboard input and mouse operation, we were able to simplify process management. There were no problems whatsoever using the new system. The improvements in reproducibility and functionality brought about by the image processing features with the introduction of E-MAX were actually very significant. For instance, we use 2D CAD data in inspections of the machining target position of electrical discharge machining electrodes and in inspections of involute curves in micro gears, which are our specialty, and by aligning the electronically generated chart against product video images on the E-MAX, we can visually make pass-fail judgments. Then by stitching the images and attaching them to product inspection data, we are now able to make an inspection report that customers can easily understand and we include it with the product when we deliver it.
Nikon: Finding your own ideas to further improve productivity while using our products is something that we can learn a lot from. You have also adopted the CNC video measuring system iNEXIV VMA-2520 with a touch probe. What is different with the iNEXIV VMA-2520 that motivated you into using it instead of a measuring microscope?
Choi: We got the touch probe with the iNEXIV so that we could measure step heights and measure from the side wall. Since many parts of a mold are thick, we rely on the touch probe to obtain data from these sorts of dimension measurements. As well as video measurement, also, using the touch probe to measure step heights has improved the measuring reproducibility for parts that have surface roughness.

Taking measurements and making calculations with the Nikon MM-60 measuring microscope configured with a high-resolution DS-2Mv digital camera and E-MAX measuring support software. Using a large LC touch panel instead of a mouse has improved measuring efficiency.
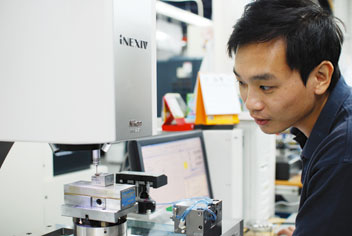
Using the iNEXIV VMA-2520 CNC video measuring system and touch probe to measure the side walls of part
Multi-sensor 3D measurements
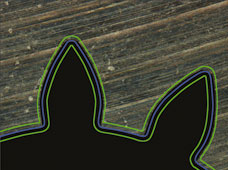
CAD chart inspection features come standard with E-MAX metrology software and iNEXIV VMA AutoMeasure.
Nikon: That is interesting. The iNEXIV is Nikon’s first multi-sensor measuring instrument. We were wondering in what ways it is actually used. Do you have any hopes or a wish list for the iNEXIV or other NIKON measuring instruments moving forward?
The future of measuring technology
Warren: I can think of three areas. The first is product reliability and stability. I think everyone who works at factories overseas thinks the same way. We of course believe that Nikon's measuring instruments are of high quality, but if an automated measuring device like the CNC video measuring instrument breaks down, it will cause the production process to malfunction. The second area concerns giving greater functionality to touch probe features and measurement calculations by improving 3D measurement performance. And the third concerns the tooth surface inspection functions of small-scale precision gears. This would no doubt lead to greater speed and precision for EDF (Extended Depth of Field) functions.
Nikon: Thank you so much for your valuable insights. Your views show us how important it is for us to support the global activities of customers, to provide products of high quality and functionality, and strengthen our worldwide technical support system. At Nikon, we strive to improve 3D measurements of precision parts by enhancing EDF functionality. We would be grateful if you could continue to give us your opinion on our products. Thank you very much for taking the time to talk with us today.

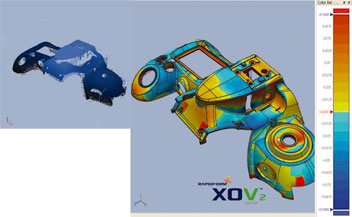
- In Nikon's NEXIV VMR or iNEXIV CNC video measuring system, images of positions with different heights are captured while adjusting the Z axis at a uniform speed, and EDF (extended depth of focus) images can be produced by processing these images. It is then possible to extract high density point group data by stitching these images and correcting aberrations. In the figure above, error comparisons between 3D CAD data and point group data are conducted on a Rapidform XOV/Verifier from INUS Technology.
