Correction ring
Objectives for biological specimens are usually designed with 0.17 mm thick coverglasses in mind. However, as mentioned above, even coverglasses designed according to microscopy specifications can have a variance in thickness of between 0.12-0.18 mm.
Spherical aberrations arising from the coverglass increase along with coverglass thickness, so a thickness greater than the standard 0.17 mm will exceed the correction built into most objectives. This does not mean, though, that thinner is always better. Since objectives are designed to compensate for spherical aberrations from a 0.17 mm coverglass, a coverglass which is too thin will also give rise to spherical aberrations. So, a coverglass either thinner or thicker than what the objective was designed for will give rise to spherical aberrations.
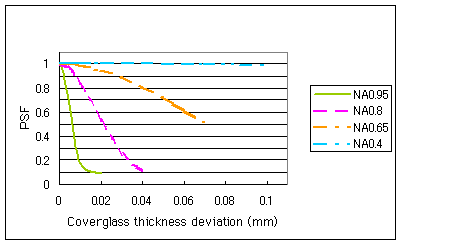
Figure 2 illustrates how deviations in coverglass thickness affect image quality. The horizontal axis indicates coverglass thickness deviation, while the vertical axis shows the amount of image degradation as point spread function, where an ideal image is 1. The graph shows that image quality varies greatly even with the same coverglass deviation depending on numerical aperture. For example, with a numerical aperture of 0.95, even a thickness deviation of 0.01 mm results in an image degraded from the ideal by a factor of one half. However, a numerical aperture of 0.4 will exert almost no influence on the image with the same thickness deviation of 0.01 mm.
Figure 3 shows microscope images of the same object observed through an objective with a numerical aperture of 0.95 with a proper coverglass (A) and a coverglass with a thickness deviation (B). The focus and the contrast in the latter image are both inferior.

Figure 2. Effects of coverglass thickness deviation

A. Using a proper coverglass

B. Using in improper coverglass
Figure 3. Comparison of image quality with proper or improper coverglass
In order to attain an ideal image with a high numerical aperture, coverglass thickness must be measured very precisely and an appropriate one chosen. This is difficult to achieve in practice, however. This is why almost all objectives with a high numerical aperture have a mechanism called a correction ring built in.
The correction ring is a piece of circular metal attached to the objective. By turning it, the microscope user can move part of the lens group along the optical axis to compensate for coverglass thickness deviation and eliminate spherical aberrations. It is simple for the microscope user to rotate the correction ring slowly to slide the focus back and forth until the best image is attained. However, correction rings have limits, too. They cannot be used when the coverglass thickness exceeds standards by too much, or if the coverglass material is a different material. In general, it's a good idea to select a No. 1-S coverglass with low thickness deviation when using objectives with high numerical apertures.
Recently new and varied microscope techniques have been accompanied by even greater performance demands. Coverglass and correction rings serve key roles to make this enhanced performance possible.
- [Reference] Yoshiyuki Shimizu: Ryoko Journal "Basic Optics Knowledge", Ryokosha Co., Ltd., 10/88

