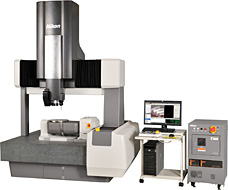
Highest Non-contact 3D accuracy available*1
Nikon introduces new Non-contact multi-sensor 3D Metrology System - HN-6060
October 25, 2010

Non-contact multi-sensor 3D Metrology System HN-6060
Tokyo - Nikon Corporation (Makoto Kimura, President) is pleased to introduce a new concept in Non-contact multi-sensor 3D Metrology System, HN-6060
The HN-6060 captures high-density 3D point clouds from part surfaces with high speed and precision. The newly designed laser scanning sensor extracts the surface form and waviness data in one scan. This non-contact technology provides new metrology capability to improve the production's process quality and performance.
- *1According to Nikon's survey on October 25, 2010
The HN-6060 will be on exhibit for the first time at the "25th Japan International Machine Tool Fair" from October 28th to November 2nd at Tokyo Big Sight.
Product Overview
| Product Name | Non-contact Multi-sensor 3D Metrology System HN-6060 |
|---|---|
| Availability | From December 24, 2010 |
Development Background
Because of the high precision, complex features, and design of various parts in automotive, aeronautics-space, and home appliances industries, the demands for 3D surface metrology with high accuracies and speed has increased dramatically.
For high precision applications, the currently available non-contact 3D CMMs may encounter technical limitations such as lower accuracy and difficulties to capture dark or shiny surfaces.
Nikon, as a long-established optical technology and metrology instrument manufacturer, has now developed the HN-6060, a complete non-contact multi-sensor 3D metrology system for part measurement - regardless of surface conditions - with the highest accuracy available. The core elements of the HN-6060 are new high precision laser scanner and 5 axes synchronized hardware control.
Main Features
- Non-contact high-precision laser scanner
The new non-contact high-precision laser scanner captures point clouds from part surfaces with high speed, precision, and density, resulting in a digital copy of the part surface. The resolution of the point clouds allows not only capturing of shape and form, but also waviness dimension.
- Measurement of complex 3D form parts
With a 5 axes synchronized hardware control allowing the optimum part orientation to the sensor, the HN-6060 can measure the part from different angles. The system is not only designed to measure complex shaped gear teeth surfaces such as hypoid gears, worm gears, helical gears, but also inspects turbine blades, digital camera housings, complex closures and more. Until now, users of traditional tactile inspection tools for gear inspection needed to rely on 2D sections of surface data. With the HN-6060, a new world of inspection possibilities opens as the 3D surface data reveals all shape and waviness information in a simple measurement.
- Newly developed sensors for non-contact measurement of any material
Nikon's newly developed high precision laser scanner sensor and Shape-From-Focus (SFF) imaging sensor measure the part surfaces with different approaches. Without the need for manual preparation such as white-powdering*2, the system captures highly repeatable and reproducible 3D data from shiny surfaces or surfaces with different reflectivity.
- *2It is usual that most non-contact 3D digitizers or scanners require white powdering process for higher and equal reflection in order to measure shiny or dark-colored surfaces. Therefore, the point clouds digitized by most of 3D scanners have uncertainty inherent to coating layer thickness.
- High accuracy and stability of main CMM body
The extreme stiffness of the main CMM body guarantees long-term stability and accuracy. Along with a linear motor drive mechanism, high-rigidity air-bearing structure, the adoption of Nikon's newly designed low thermal expansion encoder scales is employed for the three-axis orthogonal section, guaranteeing high-precision inspection over a long period of time.
- A high level of user operability
The ergonomic design of seamlessly integrated hardware and software takes full account of user safety and operability, such as fixed viewpoint joystick operation for easy acquisition of point clouds from 3D shapes and simulation for collision avoidance. The HN-6060 makes non-contact shape inspection a reality.
- HN Metrology 3D multi-sensor software seamlessly integrates with downstream point cloud applications
Newly developed HN Metrology 3D software integrates a whole range of tasks, including touch probe and image-processing measurement, acquisition of point clouds using high-precision laser scanner, and SFF sensor with built-in active texture projection mechanism. Offline / Online simulation based on the CAD model enables to verify device operation in advance.
Nikon Metrology's Focus Inspection software allows full 3D Part-to-CAD deviation comparison, GD&T evaluation and creation of detailed reports based on high-precision point cloud and mesh data. All other major brand application software for inspection and reverse engineering can handle the HN-6060's high quality point cloud data, too.
Main Specifications of Non-contact Multi-sensor 3D Metrology System HN-6060
| Accuracy | 5µm (ES, MPE) – Maximum Permissible Error of sphere-spacing measurement – JIS B 7441: 2009 1.5+4L/1000um (EMPE) - Maximum Permissible Error ISO10360-2: 2003, JIS7440-2: 2003 |
|---|---|
| Laser Scanner Throughput | 120,000Points/sec |
| Maximum part size and weight | Φ300mm, H200mm, 20kg |
| Equipment Dimensions and weight | W 1850 x D 1540 x H 2650 2,600kg 2,500kg (Revised on October 26, 2010) |
| Non-Contact Sensor Working Distance | 50mm |
| Host Computer | OS: Windows 7, 64-bit editions Interface: USB 1x, IEEE1394b 1x |
- The information is current as of the date of publication. It is subject to change without notice.
